Drones are small, remotely controlled aircraft that you can control yourself. There are many different types of drones you can build and operate, but the basic quadcopter is the easiest for beginners to build and operate. Basic drones are a great way to start learning how to operate and practice testing before moving on to more expensive and complex platforms.
PARTS
- Building the Base of the Drone
- Installing the Drive System
- Connecting the Controls
Building the Base of the Drone
- Find quadcopter designs in books or online for reference. There are many websites and books specifically dedicated to building your own drone. The most common types of homemade drones usually start with an “X” shape that allows you to mount 4 rotors (called quadcopters). This design is easy to build and even use on high-end drones.
Once you have a design to follow, you can decide the best place to place each component.
Once you’re done with the quadcopter drone, you can try a larger design that includes more motors to carry more gear like cameras.
Many drone designs are available online for free if you search for “design your own drone”.

2. Make the drone frame out of metal, plastic, or wood. Start building your frame from the material of your choice. Thin (less than 0.25 inch (0.64 cm)) plastic, balsa wood, or metal models work best. For a simple quadcopter design, stack a 12″ piece of wood, plastic, or lightweight alloy to create an “X” shape with a 90 degree angle. Each arm of the drone’s frame extends to a perfect square angle that you can draw around the frame. Choose a frame material that is at least 1 inch wide to support your motor mount.
You can buy models made of plastic, thin metal, or balsa wood at most hobby or model shops. You can also find this material at drone dealers or on sites like Amazon.
Use glue or tape to glue the two halves of the frame together.
Do not proceed to the next step until the parts of the frame are attached and the glue used has dried.
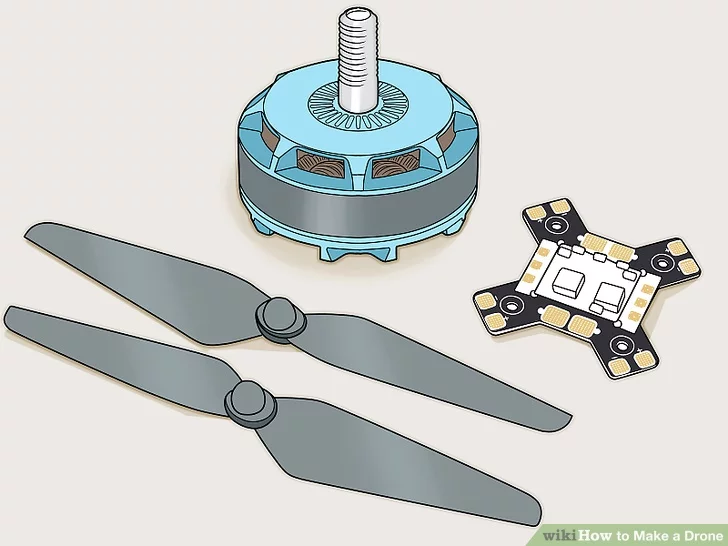
3. Purchase motors, propellers and other electronics from a drone dealer. There are some parts of your drone that you can’t build from scratch, so you’ll have to buy them. If a drone dealer isn’t near you, many hobby shops that offer models of missiles and R/C planes will ship them.[2]
You will need to purchase a speed controller, power distribution board and flight controller along with the motor and propeller. Note that most modern flight controllers are integrated with a power distribution board.
If you’re having trouble finding the parts you need, many online drone-only retailers, as well as major retailers like Amazon, carry these parts.
The drone engine should be estimated to produce twice the overall drone thrust. If your quadcopter weighs 800 grams (28 ounces), each motor should deliver 400 grams (14 ounces) for a combined total thrust of 1600 grams (56 ounces).
Make sure the rated current of the speed controller is higher than your motor.
You can often purchase these components in bundles.

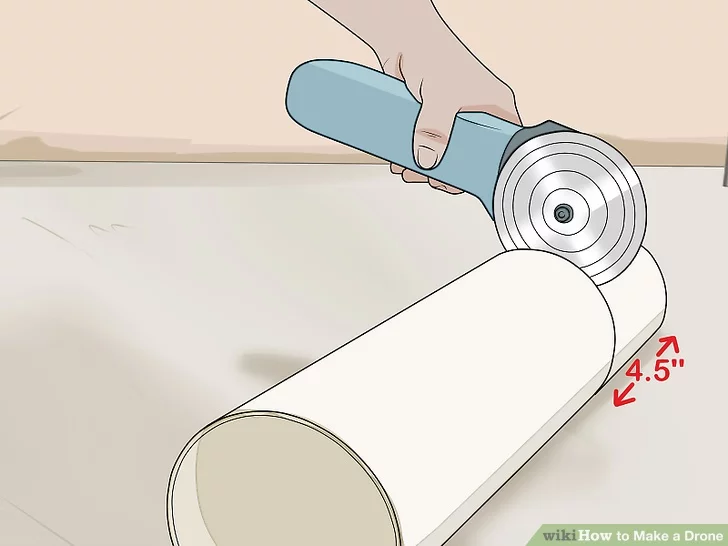
5. Cut a 1/2″ ring from 4″ PVC pipe to make a landing gear. Place the tube on its side and mark the place where you will make the cut. Then use a saw to cut all four pieces so you have 4 plastic rings made of PVC pipe.
These four rings serve as a light rail for your drone.
The cut doesn’t have to be perfect as long as the rings are thick enough to be strong, but the better the finish on your cut, the better the drone will look.
Part: 2: Installing the Drive System
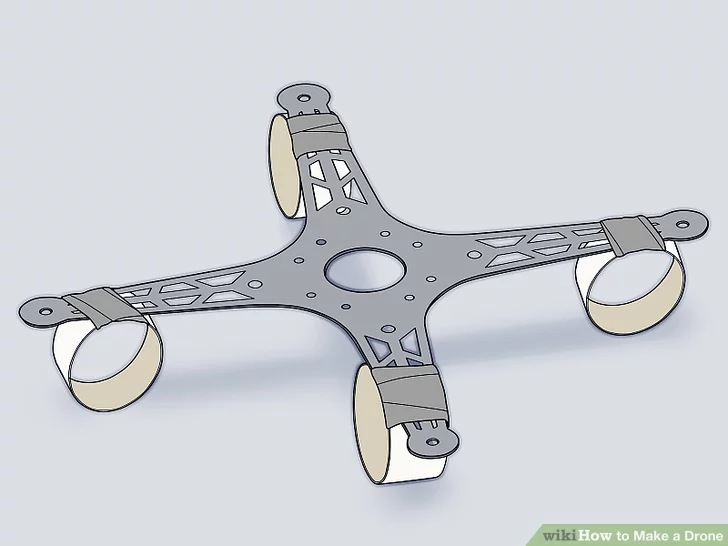
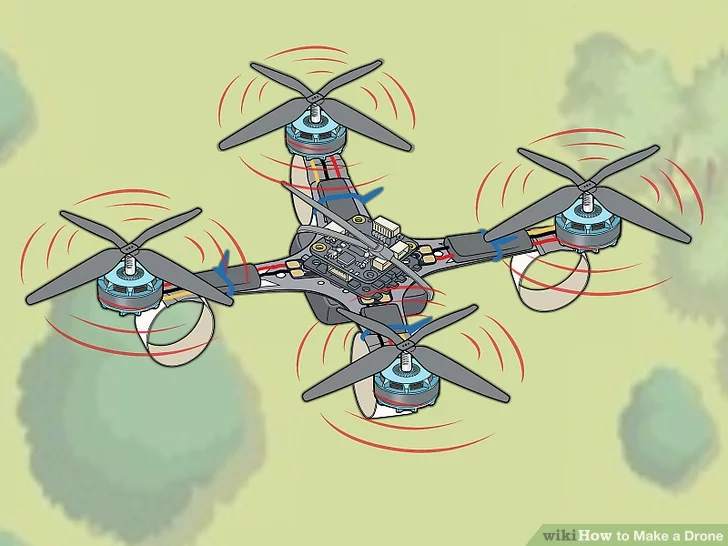
- Mount the motor on the frame. Place each motor in the holes you drilled, then use screws or bolts to attach them. Then slide the propeller onto the rod extending from the top of the motor and screw the cap that came with the motor into the top of the rod. [3]
The drone frame already has a landing gear and motor, but the center of the frame still needs to be emptied.
Tighten the bolts or screws tightly so that the motor does not move at all on the frame. Each gap creates vibrations that can destabilize the drone.

2. Use zip ties to secure the speed controllers to the bottom of the frame. The electronic speed controllers that connect to the motors should be mounted on the underside of the drone frame to prevent it from getting too top heavy when you add the rest of the components. Zip ties are an easy way to attach them. Run the zip ties through the mounting loops on the speed controllers (or just across them) and over the frame. Then pull the zip ties tight so the controllers are firmly held in place.[4]Don’t use glue the first time you assemble your drone, as you may find you want to adjust the positioning of different components based on how it flies. The speed controllers regulate how fast the motors on the drone spin. This ensures all four motors spin at the same speed so the drone will be level as it flies.

3. Attach the battery to the frame. Consider the size and shape of your battery when choosing the right installation location. When it’s flat, you can mount it in the center of the drone and then mount other components on top of it. Otherwise, you can attach the battery along with the speed control on the bottom of the drone.[5]
For most applications, it is best to mount the battery in the top center of the frame.
Use the zip fastener to keep the battery in place so you can remove and move it if you need to adjust the weight distribution of the drone later.

4. Install the switchboard. Center the power distribution board on the drone frame, on top of the battery if you have one there too. Connect the speed controller and battery lines to the circuit board after you have zipped up.
The power distribution board transmits the right amount of power to each component to keep the drone running smoothly.

Part:3: Connecting the Controls
- Purchase a wireless remote control system that works with your flight controller. Ask your local hobby shop or drone dealer for help to make sure you choose a remote control system that will work with your particular flight controller. You can often buy them in packages, but if not, the remote control system will list a compatible flight control system in the box. Choose the one that lists your air traffic controller.
The remote control system comes with the remote control itself, which you use to control your drone.
Make sure your system has a removable or rechargeable built-in battery. You need to turn it on to connect it to your flight control system.

2. Connect the motor to the speed controller. Route the wires from the motors to the respective speed controls at the bottom of the drone frame so that power can be transferred to the motors once the drone is turned on. While this relationship may vary from brand to brand, it is usually a simple male/female relationship that needs to be tightened.
If your component does not have a standard connector, consult the speed control owner’s manual to determine the best way to connect it.
You may need to solder the wires directly to the terminals on the motor itself. If this is the case, also check the motor manual to make sure you are soldering the wires to the correct connector.

3. Charge the drone battery. Use the power supply that came with the battery to connect it. Allow it to reach maximum charge (usually four hours, but check the instructions that came with the battery to check for your specific application).
You need a drone powered flight controller to connect to the remote control system.
Many drone operators choose to purchase and charge multiple batteries, as each only powers the drone for a few minutes in flight before needing to be recharged.
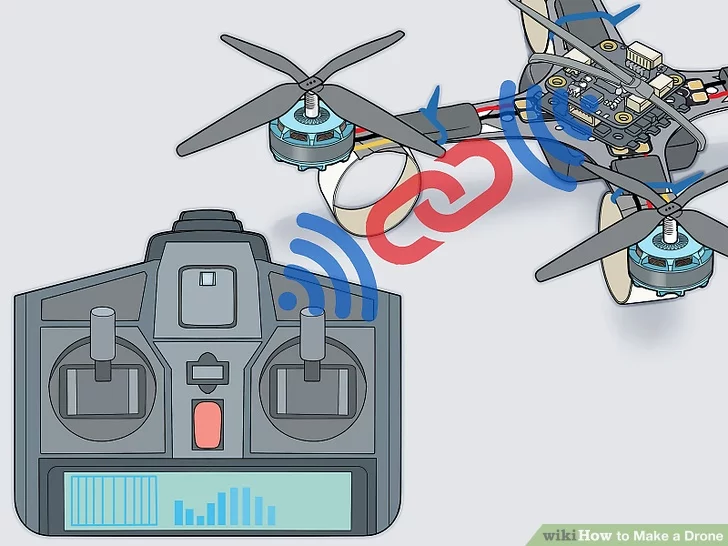
4. Connect the remote control system to the flight controller. Follow the instructions that came with your remote control system to establish a connection between the remote controller and the flight controller mounted on the drone.
In many applications, this connection is easy to establish: just press and hold the sync button on the remote control and flight controller when they are close together and they will connect.
5. Fly your drone into the air. Also turn on the drone (using the flight control switch) and radio controller. Drone controllers typically have at least two joysticks: the left stick controls the displacement (or direction the drone is pointed in) by moving from left to right, and throttle by moving back and forth. The right stick controls roll (left to right) and step (points “nose” up or down).[9]
Use the left stick to control the speed and direction.
Use the right stick to control the drone’s orientation (tilt left or right, tilt up or down).

Gallery


Gallery


No Comments