This video shows the main improvements in this version.
Watch the video to see the new import tagging features and tagging helpers, macros, tracking and counting improvements introduced in previous versions, and more.
1. Markup Import and Markup Assist (What’s New in 2023)
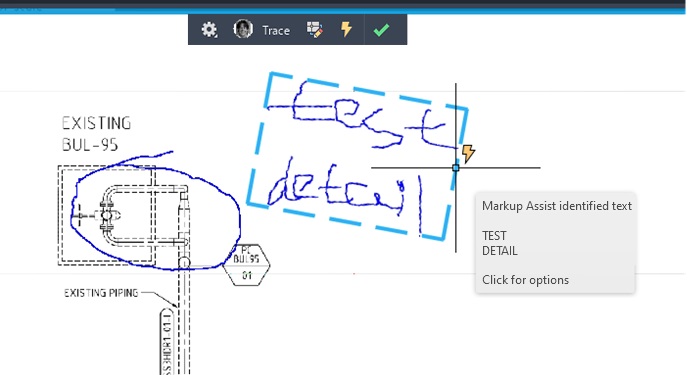
Markup Import and Markup Help uses machine learning to identify markup and provides a way to view and insert revisions into drawings with minimal manual effort.
Markers can be imported as PDF, PNG or JPG and overlaid on your images in the trace workspace. Bookmarks in imported files are automatically identified as mtext, mleaders, and revision clouds. With Markup Help, you can insert these identified marks as geometry in the image.
Import tags
Use Markup Import to place a markup version of your image in the original file, making changes to your image easier to view and integrate. For example, if you have a PDF version of your image that has added text and revision notes, use Import Markup to overlay the revised image over the original. Or, if you have a printed version of your image that contains handwritten revision notes, you can take a photo of the printed version and then import it as a JPG or PNG.
Imported files are automatically placed and aligned on the sub-images on the new track. If the imported file is not oriented correctly, you can manually redirect, move, scale, or rotate the imported file.
When viewing an imported tag, you can change the background transparency to match the visibility of the imported tag.

tagging help
Markup Assist automatically identifies tags as text, leads, and revision clouds. Click the identified tag, then paste it as an mtext, mleader, or revc object. You can edit the text before pasting or copying the text to the clipboard.
How to import tags
Click the Collaboration tab > Tracking pane > Import Tagging.
Select a PDF, PNG, or JPG markup file to import.
The tag file can be a digital copy, photo, or scanned version of the original image.

Move, align, rotate, or scale markup if the imported markup file doesn’t automatically align properly with the image.
How to use Bookmark Help
After importing tags with open tracks, enable TRACEBACK and MARKUPASSISTMODE.
Click on the identified marker.
If the selected tag is text, you can paste the object as mText, as master text, or copy the text to the clipboard. You can edit the text before pasting it.
Inserting an object adds it to the image as geometry.
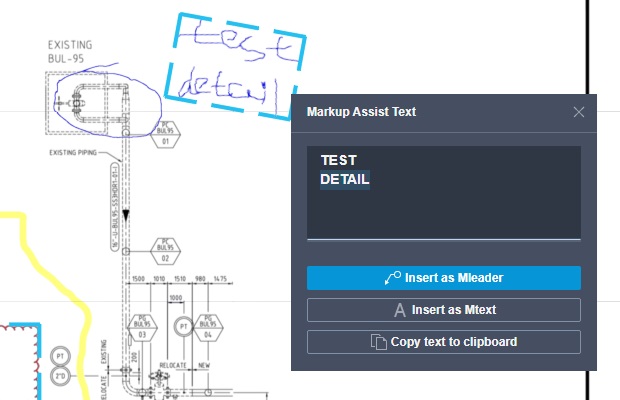
If a tagging object is marked as a revision cloud, you can paste it as a revision cloud.
New command
MARKUPASSIST – Analyzes imported markup and can help place additional text descriptions and clouds for revisions faster and with less manual effort.
MARKUPIMPORT – Imports tagged images (images/pdf) into your DWG as a new track.
New system variables
MARKUPASSISTMODE – Controls whether an identified mark is highlighted.
MARKUPPAPERDISPLAY – Indicates whether digital markup is active or not.
MARKUPPAPERTRANSPARENCY – Controls the level of transparency when digital markup is active.
2. My Insights: Macro Advisor
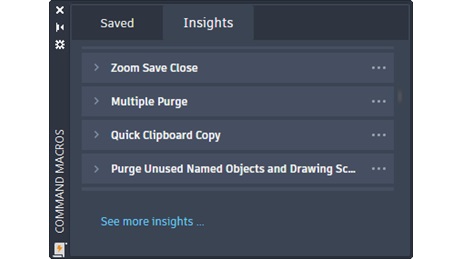
Macro Insights are recommended macro commands designed to help you be more productive.
Command macros contain a set of commands and system variables that help automate the tasks you often perform when working in AutoCAD. AutoCAD generates macro information based on your use of unique commands. Use the Command Macro Palette to view, try, and save recommended command macros. Command macros can be added to the Saved tab of the Command Macros palette and even to the toolbar for use.
Note: This feature is currently only supported in AutoCAD and is not available for AutoCAD-based toolkits. In addition, you must have a commercial license and be included in the specified user plan to receive information. Find more
Insights TAB Section
The macro data is displayed in the Insights section of the Command Macro palette. You can expand any macro information to see descriptions and related command macros. Click Try to test the command macro, or click Save to add the command macro to the Saved tab of the Command Macros palette.
Saved Parts
After a command macro has been added to the Saved tab of the Command Macros palette, by clicking Save on the Insights tab you can:
- Run a command macro by clicking the button
- Edit macro properties of macro commands and strings
- Add command macro to bar
New command
COMMANDMACROS – Opens the Command Macro palette from where you can manage and use recommended macro commands.
COMMANDMACROSCLOSE – Closes the command macro palette.
New system variables
COMMANDMACROSSTATE – Indicates whether the command macro palette is open or closed.
MACROINSIGHTSSUPPORT – Controls whether macro information can be retrieved based on the order in which the commands you run.
MACRONOTIFY – Controls macro display notifications.
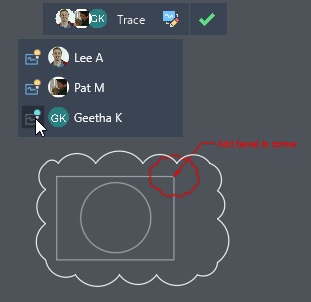
3. Trace
Based on the original version of the tracking feature, you can now create traces on your desktop and contribute to traces created by others.
Create a New Trace
Click the Collaboration tab > Tracking Pane > Trace Palette.
The Tracks palette opens.
In the palette, click Create Track.
A new track is added to the palette and becomes active.
Right-click and select Rename to rename the route.
Note: You can also use the new option in the TRACE command.
Contribute to Trace
Click the Collaboration tab > Tracking Pane > Trace Palette.
The Tracks palette opens.
- Select the route you want to donate.
- On the tracking toolbar, click Edit Track.
- Use standard commands to add content to a track.
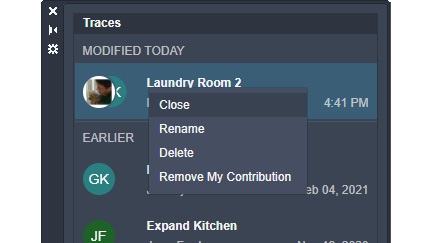
- Delete your Contribution
- Right-click the track name in the Tracks palette.
- Select Delete my post
post review
Click an avatar in the toolbar to see who contributed to active tracking.
If there are contributions from others, you can do the following:
Hover over an employee’s name in the toolbar’s drop-down menu to highlight their contribution to tracking.
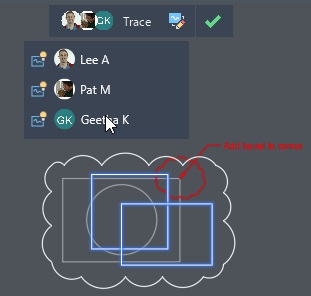
Click the icon next to the contributor’s name to hide or view their post.
New command
TRACEEDIT – Changes the current track in edit mode so you can contribute to the track.
TRACEVIEW – Changes the active trace in preview mode, allowing you to edit the master image.
4. Count
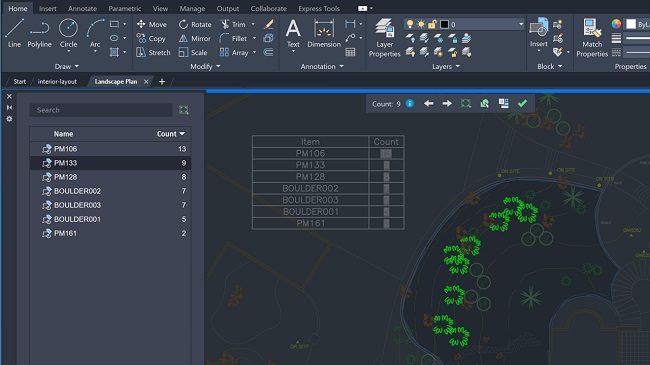
Define a rectangular or polygonal selection area, the entire model space, or a boundary object as the calculation area. A valid boundary object must be a closed polyline consisting of linear segments and not self-intersecting.
The counting range defined in the previous count can also be used in the current count.
New command
COUNTAREA – Defines an area to count instances of an object or block.
COUNTAREACLOSE – Removes the count selection area.
SELECTCOUNT – Finds all objects in the current number that match the properties of the selected object, then adds them to the selection set.
Changed command
COUNT – Counts and marks the instances of the selected object in the drawing.
5. Floating Window of Drawing
Improvements include:
- The docked command window now remains with the active drawing window.
- The floating command window maintains its position.
- When the image windows overlap, the active drawing window is displayed on top.
- You can hang the window to draw in its place. A drawing window remains attached to the top of the main AutoCAD application window.
- Right-click the floating window title bar for more options.
6. 2D – Graphics Display
The new graphics engine offers:
Improved scaling and panning performance for TrueType multitext images, long polylines, or solid strokes in a 2D wireframe visual style
Optimized GPU memory usage when opening multiple images in DirectX 12 . mode
Removed support for DirectX 9.
7. Sheet Set Manager Used for AutoDesk Docs.
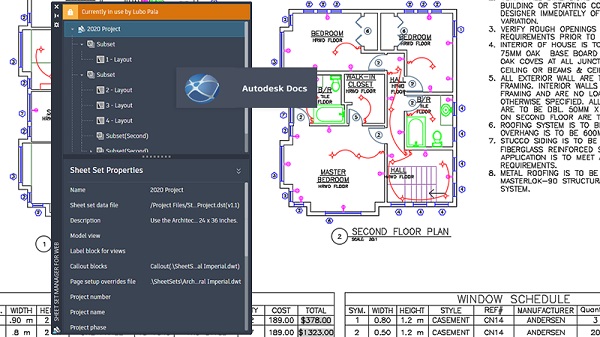
Manage worksheets from Autodesk Docs with the new Web Sheet Sets Manager.
The lightweight version of the legacy sheet set manager, Web Sheet Set Manager, displays and manages named sheet collections stored in Autodesk Docs. By default, when opening a DST file with Autodesk Docs, the Web Sheet Collection Manager is displayed.
The Web Sheet Set Manager offers the following key features:
Create and delete sheets and subsets
Define sheet set properties, including sheets and subsets
Publish sheet sets in PDF format
Complete set of leaves
New system variables
SSMDETECTMODE – Specifies which sheet set manager is shown when opening a cloud-based DST file.
8. Drawing & Layout Tabs
Changes to the image and layout sections make it easy to determine which image and layout is active. The changes also make it easier to see which drawing is active in the Drawing tab’s pop-up menu.
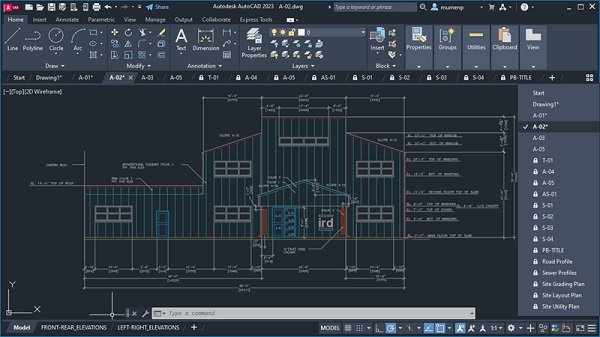
Improvements include:
Modern look of sections for drawing and layout.
The active tab is highlighted.
The active image is checked in the image overflow menu.
Note: Hold down the mouse pointer over an inactive drawing tab to display the close button.
9. CutBase
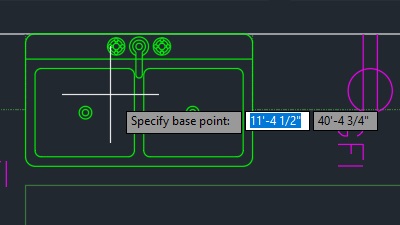
The new CUTBASE command copies the selected object to the clipboard along with the specified base point and removes it from the image.
Click the Home tab > Clipboard > Crop with Base Points.
Determine the base point of the image.
Select the object you want to cut and press Enter.
Use PASTECLIP to indicate the insertion point when placing objects in other images.
10. Polyline Extend
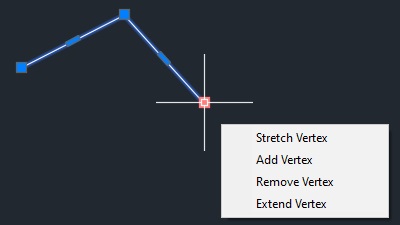
The new handle option, Extend Vertex, adds a new point to your polyline, extending from the selected end handle. You no longer need to reverse the direction of the polyline.
The existing Add vertex option can add a vertex between the end and the previous vertex. This depends on the direction in which the polyline is drawn.
With the new Extend Vertex handle option, vertices are always extended by the selected end handle, regardless of which direction the polyline is drawn.

Gallery


Gallery


No Comments